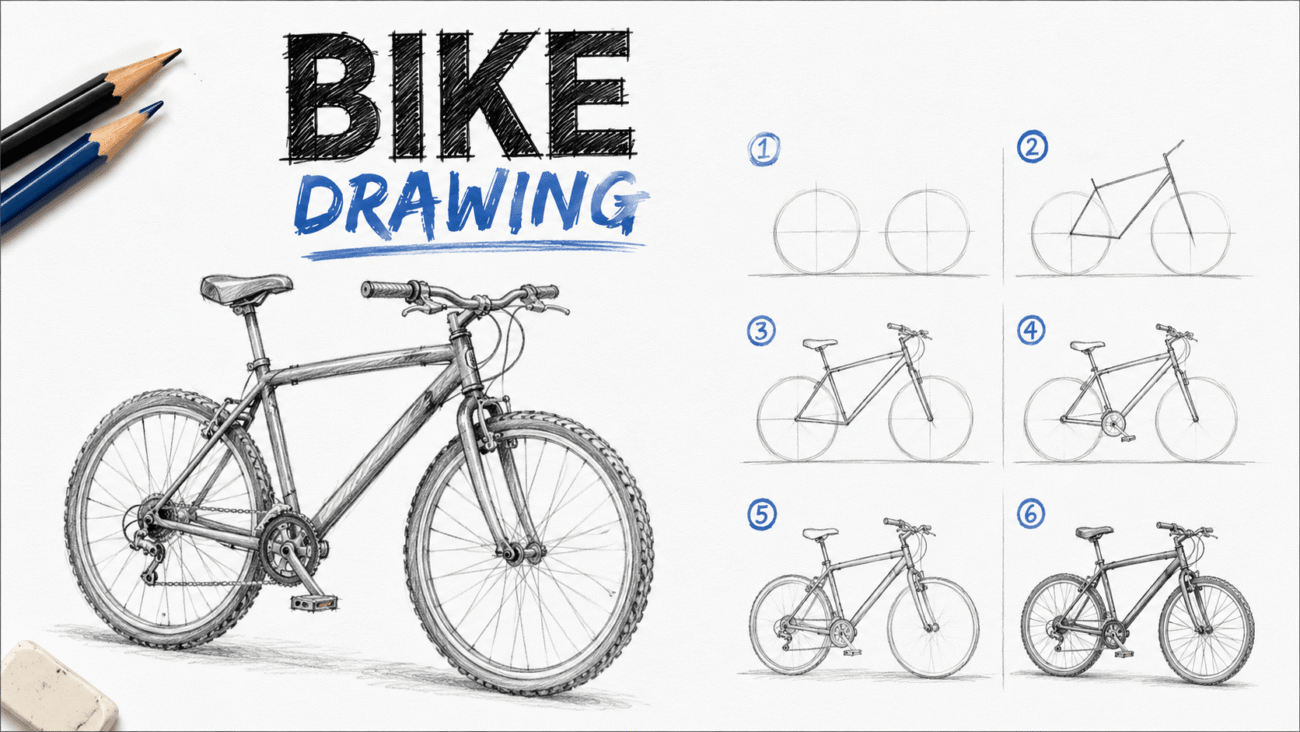
A great bike drawing doesn’t begin with perfect artistic talent—it starts with understanding simple shapes and proportions. Whether you’re sketching a classic bicycle, creating a dirt bike drawing, or practicing drawings of motocross bikes, breaking the subject into smaller parts makes the process much easier.
Many beginners struggle because they try to draw every detail at once. Professional artists usually work in the opposite way. They start with circles, straight lines, and basic outlines before adding the frame, wheels, handlebars, and other features.
This guide walks you through the drawing process step by step, shares practical techniques used by experienced artists, and highlights common mistakes to avoid so your sketches become more accurate with every practice session.
Why Learning Bike Drawing Is Easier Than You Think
At first glance, a bicycle or motorcycle may seem complicated because of the many parts involved.
In reality, most bikes are built from repeating geometric shapes. Once you understand how these shapes connect, drawing becomes much more manageable.
Instead of focusing on dozens of small details, think about the overall structure first.
A simple approach allows you to:
- Improve proportions
- Draw faster
- Correct mistakes more easily
- Build confidence
- Create cleaner sketches
Even experienced illustrators begin with rough construction lines before refining their artwork.
Basic Drawing Supplies
You don’t need expensive art materials to create a good bike drawing.
A few basic supplies are enough to get started.
Pencils
A standard graphite pencil works well for sketching.
Many artists use lighter pressure during the early stages so construction lines can be erased easily later.
Eraser
A quality eraser is just as important as the pencil.
Instead of removing entire sections, use it to clean up unnecessary guide lines while preserving the main drawing.
Paper
Any smooth drawing paper is suitable for practice.
As your skills improve, you can experiment with sketchbooks designed for graphite or ink.
Ruler
Although freehand drawing develops better observation skills, a ruler can help beginners understand frame alignment and symmetry.
Eventually you’ll rely on it less.
Understanding Bike Proportions
One of the biggest challenges beginners face is getting the proportions right.
Fortunately, bicycles follow a fairly predictable layout.
The wheels usually establish the entire drawing.
Once they’re positioned correctly, the remaining components become much easier to place.
Start With Two Equal Circles
Every bicycle drawing begins with the wheels.
Draw two circles that are:
- Equal in size
- Evenly spaced
- Aligned horizontally
Don’t worry about perfection.
Light construction circles can always be adjusted later.
Connect the Wheels
After placing the wheels, sketch the general frame using straight guide lines.
At this stage, avoid adding small mechanical details.
Your goal is simply to establish the bike’s overall proportions.
Add the Main Frame
Most bicycles use triangular frame shapes.
Instead of drawing tubes individually, begin by sketching the larger triangles first.
This approach helps maintain balance throughout the drawing.
Bike Drawing Easy: A Beginner-Friendly Process
If you’re searching for drawing bike easy methods, keeping the process simple is the key.
Trying to draw every spoke, cable, and gear immediately often leads to frustration.
Instead, follow a logical sequence.
Step 1: Draw the Wheels
The wheels determine almost every other measurement.
Take your time placing them correctly.
Step 2: Sketch the Frame
Use straight lines to connect the wheels with a simple triangular frame.
Don’t worry if it looks rough.
This stage is only a guide.
Step 3: Add the Seat and Handlebars
Once the frame looks balanced, lightly sketch the saddle and handlebars.
Keep the shapes basic.
Details come later.
Step 4: Draw the Crank and Pedals
Position the crank near the center of the frame.
Then add two simple pedals.
These parts help define the bicycle’s proportions.
Step 5: Refine the Outline
Now replace rough guide lines with cleaner, darker lines.
Erase unnecessary construction marks as you go.
Step 6: Add Details
Finally, include:
- Tires
- Spokes
- Chain
- Brakes
- Seat texture
- Hand grips
Adding details gradually keeps the drawing organized.
Dirt Bike Drawing
A dirt bike drawing follows many of the same principles as drawing a bicycle, but several design features create a much more aggressive appearance.
Unlike bicycles, dirt bikes include engines, suspension systems, larger tires, and protective body panels.
These additional components should be added only after the basic proportions are complete.
Begin With the Wheels
Even though dirt bikes look more complex, the wheels still establish the overall structure.
Sketch them first before worrying about the engine or suspension.
Focus on the Frame
The motorcycle frame supports every major component.
Keep the initial frame simple.
You can always refine it later with more accurate angles.
Add the Suspension
Suspension forks give dirt bikes their distinctive appearance.
Draw the front forks before adding the handlebars.
This makes it easier to maintain proper alignment.
Sketch the Engine
Instead of drawing every engine component individually, begin with a simple block shape.
Once the proportions feel correct, divide the engine into smaller sections.
Finish With Off-Road Details
Now add features such as:
- Knobby tires
- Front fender
- Rear fender
- Exhaust
- Foot pegs
- Brake discs
These details transform a simple motorcycle outline into a recognizable dirt bike.
Understanding Bike Shapes
Professional artists rarely think in terms of individual parts.
Instead, they simplify everything into basic forms.
For example:
- Wheels become circles.
- The frame becomes triangles.
- Handlebars become curved lines.
- Seats become rounded rectangles.
- Engines become simple blocks.
- Tires become thick rings.
Learning to recognize these shapes makes every future drawing easier.
Practice From Real References
One habit separates improving artists from frustrated beginners.
They regularly study real bicycles and motorcycles.
Look at reference photos from different angles.
Notice how the frame changes when viewed from the side compared with a three-quarter perspective.
You don’t need to copy every photograph exactly.
Instead, use references to understand how different components connect.
Over time, you’ll rely less on photos and more on your understanding of the bike’s structure.
Drawings of Motocross Bikes
Creating drawings of motocross bikes can feel challenging at first because these motorcycles include more mechanical parts than a standard bicycle. However, once you understand the overall shape, the extra details become much easier to manage.
Unlike road motorcycles, motocross bikes are built for rough terrain. Their taller suspension, high front fender, and knobby tires give them a distinctive look that artists should try to capture before focusing on smaller details.
Rather than drawing every component immediately, work from large shapes to small ones.
Study the Overall Silhouette
Before adding mechanical parts, observe the bike’s outline.
Ask yourself questions like:
- Where does the seat begin?
- How high is the front fender?
- What angle does the fuel tank create?
- How large are the wheels compared to the frame?
Getting the silhouette right usually has a bigger impact than drawing every bolt accurately.
Build the Details Gradually
Once the main outline looks balanced, begin adding details such as:
- Suspension forks
- Swingarm
- Chain
- Exhaust
- Engine
- Brake discs
- Foot pegs
Adding one section at a time keeps the drawing clean and prevents unnecessary corrections later.
Bicycle vs Dirt Bike vs Motocross Bike
Although the drawing process is similar, each type of bike has unique characteristics.
| Feature | Bicycle | Dirt Bike | Motocross Bike |
|---|---|---|---|
| Wheels | Thin or medium tires | Wide knobby tires | Aggressive off-road tires |
| Frame | Lightweight triangles | Strong motorcycle frame | Racing-style frame |
| Engine | None | Yes | Yes |
| Suspension | Sometimes front only | Front and rear | Advanced suspension |
| Difficulty | Beginner | Intermediate | Intermediate to Advanced |
Starting with a bicycle is often the easiest way to learn proportions before moving on to motorcycles.
Common Mistakes Beginners Make
Every artist makes mistakes while learning. Recognizing them early can speed up your progress.
Drawing the Wheels Different Sizes
Even a small difference in wheel size can make the entire drawing look unrealistic.
If you’re drawing a side view, both wheels should usually match in size unless perspective changes the appearance.
Using light construction circles first makes corrections much easier.
Adding Details Too Early
Many beginners immediately draw spokes, chains, or engines.
This often leads to proportion problems because the main structure hasn’t been established yet.
Always complete the basic outline before adding fine details.
Pressing Too Hard With the Pencil
Dark lines are difficult to erase.
Professional artists usually begin with soft, light sketches and gradually darken the final lines.
This gives you the freedom to make adjustments as the drawing develops.
Ignoring Reference Images
Trying to draw entirely from memory can slow your progress.
Reference photos help you understand how real bicycles and motorcycles are built.
Over time, you’ll naturally remember more details without relying on photos.
Forgetting Perspective
A bicycle viewed from the side looks very different from one viewed at an angle.
Understanding perspective helps your drawings appear more realistic and three-dimensional.
Expert Tips for Better Bike Drawing
Small improvements in technique often make a bigger difference than buying expensive art supplies.
Practice Basic Shapes First
Instead of drawing complete bikes every day, spend time practicing:
- Circles
- Straight lines
- Triangles
- Cylinders
- Ellipses
These shapes appear throughout nearly every bicycle and motorcycle drawing.
Draw Larger Before Smaller
Working on a larger sketch makes it easier to judge proportions and add details accurately.
Once you’re comfortable, you can create smaller, cleaner versions.
Flip Your Drawing
Occasionally turn your sketch upside down or view it in a mirror.
This simple trick makes proportion errors much easier to spot.
Be Patient
Most artists don’t produce polished drawings on the first attempt.
Improvement comes from regular practice rather than speed.
Comparing today’s sketch with one you drew a month ago is often more helpful than comparing yourself to experienced artists.
Adding Shading and Depth
Shading transforms a flat outline into a realistic illustration.
Even simple shadows can make a bicycle or motorcycle look much more convincing.
Choose One Light Source
Imagine sunlight coming from one direction.
Keep your highlights and shadows consistent throughout the drawing.
This creates a more natural appearance.
Shade Large Areas First
Begin with broad shadows under:
- The frame
- Seat
- Engine
- Tires
Afterward, add darker shadows to smaller mechanical parts.
Blend Gradually
Avoid making every area equally dark.
Smooth transitions between light and shadow create depth without making the drawing appear overly busy.
Understanding Perspective
Perspective helps viewers believe the bike exists in three-dimensional space.
A side profile is usually the easiest place to start because most parts remain visible.
As your confidence grows, practice drawing bikes from:
- Front angles
- Rear angles
- Three-quarter views
- Slightly elevated viewpoints
Each new perspective strengthens your understanding of bike construction.
Practice Exercises
Consistent practice is more valuable than spending hours on one drawing.
Try these exercises:
- Draw five bicycle wheels using perfect circles.
- Sketch different bicycle frame styles.
- Practice handlebars from multiple angles.
- Draw only dirt bike tires with different tread patterns.
- Create quick 5-minute bike sketches without worrying about details.
- Redraw the same bike after a week and compare your progress.
Repeating these simple exercises builds confidence and improves accuracy far more effectively than attempting one highly detailed illustration.
FAQs About Bike Drawing
What is the easiest way to start a bike drawing?
The easiest way to begin a bike drawing is by sketching two equal-sized circles for the wheels. Once they’re aligned, use light lines to create the frame before adding the seat, handlebars, pedals, and other details. Starting with simple shapes makes the drawing much easier to adjust as you work.
How can beginners make drawing a bike easy?
If you’re looking for drawing bike easy techniques, focus on the basic structure rather than small parts. Draw the wheels, frame, and handlebars first, then gradually add details like spokes, chains, and brakes. Using reference photos can also improve accuracy.
What makes a dirt bike drawing different from a bicycle drawing?
A dirt bike drawing includes motorcycle-specific features such as an engine, suspension, exhaust system, larger tires, and body panels. While the overall drawing process is similar, dirt bikes have a more complex structure that benefits from careful planning and step-by-step sketching.
How do artists create realistic drawings of motocross bikes?
Professional artists usually begin with the bike’s overall silhouette before adding mechanical details. Studying real drawings of motocross bikes and reference photos helps you understand frame proportions, suspension angles, and tire shapes, making your artwork more realistic.
How often should I practice bike drawing?
Short, consistent practice sessions usually produce better results than occasional long sessions. Spending 20 to 30 minutes several times a week drawing bicycles, dirt bikes, or motocross bikes can steadily improve your understanding of proportions, perspective, and shading.
Conclusion
Learning bike drawing is less about natural talent and more about building a solid understanding of shapes, proportions, and observation. By starting with simple circles and guide lines, you create a strong foundation that makes every stage of the drawing process easier.
Whether you’re practicing drawing bike easy exercises, working on a detailed dirt bike drawing, or creating realistic drawings of motocross bikes, patience and consistency are your greatest tools. Focus on the overall structure first, add details gradually, and don’t be afraid to make corrections along the way.
Remember that every sketch is part of the learning process. Study real bikes, experiment with different angles, and practice regularly. Over time, you’ll notice cleaner lines, better proportions, and more confident drawings that reflect your growing skills.
