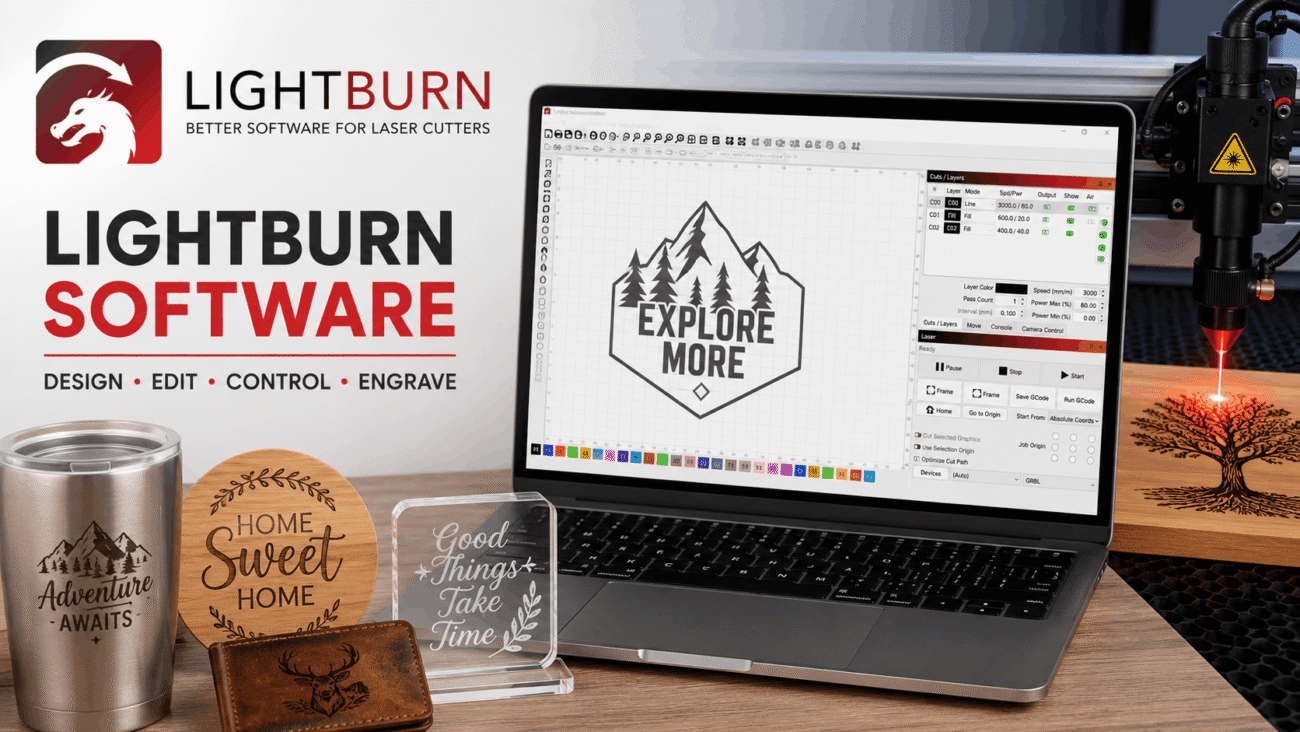
If you’ve recently purchased a laser engraver or are thinking about getting one, you’ve probably come across LightBurn software. It’s one of the most widely used programs for designing, editing, and controlling laser engraving and cutting machines. Whether you’re creating custom signs, engraved tumblers, jewelry, or business products, LightBurn simplifies much of the process.
What makes LightBurn stand out isn’t just its design tools. It brings everything together in one place—from creating artwork and adjusting laser settings to sending jobs directly to compatible machines. Instead of switching between multiple applications, users can complete an entire project from a single interface.
Whether you’re a hobbyist working from a home workshop or a business producing products every day, understanding how LightBurn works can help you improve efficiency, reduce mistakes, and get better engraving results.
In this guide, you’ll learn what LightBurn software is, its key features, supported devices, benefits, limitations, and practical tips for getting started.
What Is LightBurn Software?
LightBurn software is a professional laser control and design application created specifically for laser engraving and laser cutting machines.
Unlike general graphic design software, LightBurn combines design tools with machine control features. Users can create artwork, import existing files, adjust cutting parameters, preview jobs, and send projects directly to supported laser systems.
Instead of requiring separate programs for design and machine operation, LightBurn provides an all-in-one workflow that saves both time and effort.
It is commonly used for projects such as:
- Wood engraving
- Acrylic cutting
- Leather engraving
- Glass marking
- Metal marking (with compatible lasers)
- Personalized gifts
- Business signage
- Prototype development
Because of its flexibility, LightBurn has become a popular choice among both beginners and experienced makers.
Why Is LightBurn Software So Popular?
Laser engraving has grown rapidly in recent years, but many users quickly discover that the software supplied with their machine is often limited.
LightBurn solves this problem by offering more powerful editing tools, broader hardware compatibility, and a smoother overall experience.
Some reasons users choose LightBurn include:
- Easy-to-use interface
- Powerful editing tools
- Supports many laser brands
- Fast workflow
- Live project previews
- Camera support on compatible systems
- Regular software updates
- Active user community
For many workshop owners, it becomes the central hub for every engraving project.
How LightBurn Software Works
Although LightBurn includes many advanced features, its basic workflow is surprisingly straightforward.
Step 1: Create or Import Artwork
Projects can begin in several ways.
Users may draw directly inside LightBurn or import existing designs from other graphics programs.
Supported file formats include:
- SVG
- AI
- DXF
- PNG
- JPG
- BMP
This flexibility allows designers to continue using familiar graphic design tools while taking advantage of LightBurn’s laser-specific features.
Step 2: Arrange the Design
Once artwork is imported, objects can be:
- Resized
- Rotated
- Duplicated
- Aligned
- Grouped
- Mirrored
The workspace provides a clear representation of the laser bed, helping users position designs accurately before engraving begins.
Step 3: Configure Laser Settings
Each design layer can receive its own laser settings.
Common adjustments include:
- Power
- Speed
- Number of passes
- Air assist
- Line interval
- Cut order
This level of control makes it possible to engrave detailed artwork while cutting thicker materials within the same project.
Step 4: Preview the Job
One feature many users appreciate is the built-in preview window.
Before sending a project to the laser, LightBurn simulates the engraving process.
Previewing helps identify:
- Incorrect layer order
- Missing objects
- Unnecessary travel movements
- Unexpected engraving paths
Taking a few moments to review the preview can prevent wasted material and save valuable production time.
Step 5: Send the Job to the Laser
After confirming the settings, users send the project directly to a compatible laser machine.
Depending on the hardware, LightBurn can also provide:
- Frame previews
- Manual positioning
- Origin selection
- Device controls
- Real-time job monitoring
Key Features of LightBurn Software
LightBurn offers far more than simple laser control.
Built-in Design Tools
Many users are surprised by how capable the built-in editor is.
Instead of relying entirely on external software, you can create shapes, edit text, adjust curves, weld objects, offset designs, and perform numerous other editing tasks directly inside LightBurn.
For many everyday projects, there’s no need to open another design application.
Layer Management
Layers help organize complex engraving jobs.
Each layer can have independent settings for:
- Speed
- Power
- Fill mode
- Line mode
- Air assist
- Number of passes
This makes multi-stage projects much easier to manage.
Material Library
One feature that saves considerable time is the Material Library.
Instead of entering laser settings repeatedly, users can save commonly used configurations for materials such as plywood, acrylic, leather, cardboard, or anodized aluminum.
Over time, this library becomes an invaluable resource for maintaining consistent engraving quality.
Camera Integration
Certain laser setups support camera integration.
This allows users to:
- Position artwork more accurately.
- Align designs with existing objects.
- Reduce material waste.
- Preview placement before engraving.
For businesses producing customized products, camera support can significantly improve workflow efficiency.
Variable Text and Serial Numbers
LightBurn also supports automatic text generation.
Users can create:
- Serial numbers
- Sequential numbering
- Date fields
- Variable text
This feature is especially useful for manufacturing, inventory tracking, awards, and personalized products.
Supported Laser Machines
One of LightBurn’s biggest strengths is its compatibility with a wide range of laser controllers.
Commonly supported devices include:
| Laser Type | Supported |
|---|---|
| CO₂ Lasers | Yes |
| Diode Lasers | Yes |
| Fiber Lasers | Supported with compatible edition |
| DSP Controllers | Yes |
| GRBL Controllers | Yes |
| Galvo Lasers | Supported with compatible license |
Before purchasing, always confirm that your specific laser controller is listed as compatible on the official LightBurn website, as supported hardware continues to expand with new software releases.
Real-World Example
Imagine you’re running a small business that creates personalized wooden signs.
A customer orders ten signs with different family names. Rather than designing each sign from scratch, you create one template in LightBurn and use its text editing tools to quickly update each name while keeping the layout consistent.
Once the designs are ready, you preview the engraving paths, verify the laser settings for your wood material, and send each job to the machine. The streamlined workflow saves time, reduces errors, and helps deliver a professional-looking product with minimal effort.
Advantages of LightBurn Software
There are plenty of laser control programs available today, but LightBurn has built a loyal following because it combines powerful features with an interface that’s approachable for beginners. It helps users spend less time learning complicated software and more time creating quality projects.
User-Friendly Interface
One of the first things new users notice is how organized the workspace feels.
Tools are grouped logically, and frequently used functions are easy to find. Even if you’re new to laser engraving, basic tasks like importing artwork, resizing designs, or adjusting laser settings become familiar after a few projects.
All-in-One Workflow
Many laser owners use one application for designing graphics and another for controlling the laser machine.
LightBurn brings these tasks together into a single program. Designing, editing, configuring laser settings, previewing the project, and sending it to the machine can all be done without switching software.
Wide Hardware Compatibility
A major advantage of LightBurn software is its support for many popular laser controllers.
This flexibility makes it attractive to hobbyists upgrading their equipment as well as businesses operating multiple laser machines.
Powerful Editing Features
LightBurn isn’t just a machine controller—it also includes a surprisingly capable graphic editor.
Users can:
- Create vector shapes
- Edit text
- Weld objects
- Offset designs
- Resize graphics
- Mirror artwork
- Adjust nodes and curves
For many engraving projects, these built-in tools eliminate the need for separate design software.
Regular Updates
The software continues to improve through regular updates that introduce new features, bug fixes, and compatibility improvements.
Checking release notes before updating is always recommended, especially for production environments where stability is important.
Limitations of LightBurn Software
Although LightBurn is an excellent solution for many users, it isn’t perfect.
Understanding its limitations helps set realistic expectations before purchasing a license.
Paid Software
Unlike some basic laser programs, LightBurn requires a paid license after the trial period ends.
Many users feel the investment is worthwhile because of the time it saves, but it’s still something to consider when budgeting for a laser setup.
Learning Advanced Features
Basic engraving is easy to learn, but advanced capabilities such as variable text, camera calibration, layer optimization, and complex vector editing require practice.
Fortunately, the official documentation and community tutorials make learning much easier.
Hardware Compatibility Matters
Not every laser engraver works with LightBurn.
Before purchasing a license, verify that your machine’s controller is officially supported. This simple step can prevent frustration later.
LightBurn Software vs. Other Laser Software
Choosing software often depends on your machine, experience level, and workflow.
The table below highlights some general differences.
| Feature | LightBurn | Basic Manufacturer Software |
|---|---|---|
| Built-in Design Tools | Excellent | Often Limited |
| Laser Control | Excellent | Good |
| Material Library | Yes | Sometimes |
| Camera Support | Available | Rare |
| Multi-Layer Editing | Yes | Limited |
| Hardware Compatibility | Broad | Usually Limited to One Brand |
| Regular Updates | Frequent | Varies |
For users who regularly engrave or cut materials, the additional flexibility offered by LightBurn often makes daily work much more efficient.
Best Practices for Using LightBurn Software
Owning good software is only part of the equation. Following a few best practices can improve engraving quality while reducing mistakes.
Test New Materials First
Different materials respond differently to laser power and speed.
Before engraving a final product, perform a small test on a scrap piece to find the best settings.
Save Material Presets
If you frequently engrave the same materials, create entries in the Material Library.
This helps maintain consistent results and saves time on future projects.
Organize Layers Clearly
Assign separate layers for engraving, cutting, scoring, and marking.
Keeping operations organized reduces confusion and makes complex jobs easier to manage.
Preview Every Job
The preview feature is one of LightBurn’s most valuable tools.
Taking a minute to review the engraving path can reveal misplaced objects, incorrect settings, or unnecessary machine movement before any material is used.
Keep Software Updated
Software updates often improve performance, compatibility, and security.
However, if you use your laser for business, consider reviewing update notes before installing them on a production computer.
Common Mistakes Beginners Make
Even experienced makers occasionally make mistakes, but beginners often encounter the same issues during their first projects.
Skipping Material Tests
Using default settings without testing can result in burned edges, incomplete cuts, or weak engraving.
Always test first.
Incorrect Focus
Laser focus directly affects engraving quality.
A poorly focused laser may produce blurry engravings or struggle to cut through materials properly.
Ignoring Safety
Laser engraving should never be left unattended.
Always use proper ventilation, wear recommended safety equipment when appropriate, and follow your machine manufacturer’s operating guidelines.
Forgetting to Check Layers
Assigning the wrong power or speed to a layer can ruin an otherwise perfect project.
Develop the habit of reviewing every layer before pressing Start.
Expert Tips for Better Results
After working with laser engravers for a while, many users develop habits that improve both quality and efficiency.
Some useful tips include:
- Keep your laser lens clean.
- Store frequently used settings in the Material Library.
- Use vector graphics whenever possible for cleaner cuts.
- Regularly clean mirrors and machine components according to the manufacturer’s recommendations.
- Keep your workspace organized.
- Practice on inexpensive materials before engraving valuable items.
- Back up your project files regularly.
Small improvements in workflow often produce noticeable improvements in engraving quality.
Real-World Scenario
Imagine a small business specializing in personalized gifts.
Every week, customers order engraved cutting boards, tumblers, leather wallets, and acrylic awards.
Instead of creating every project from scratch, the business stores reusable templates inside LightBurn. Frequently used material settings are saved in the Material Library, and each product type has its own workspace layout.
When a new order arrives, the operator simply updates the customer’s name or artwork, confirms the preview, and starts engraving.
This organized workflow saves time, minimizes mistakes, and allows the business to complete more orders without increasing production complexity.
FAQS
1. What is LightBurn software used for?
LightBurn software is designed to create, edit, and control laser engraving and cutting projects. It allows users to design artwork, import graphics, adjust laser settings, preview jobs, and send files directly to compatible laser machines. It’s widely used by hobbyists, small businesses, schools, and professional workshops.
2. Is LightBurn software beginner-friendly?
Yes. Although LightBurn includes advanced features for experienced users, its clean interface makes it approachable for beginners. Most new users can learn the basic workflow—importing a design, adjusting settings, and starting a laser job—after a few practice projects.
Taking advantage of the official tutorials and user guides can make the learning process even smoother.
3. Does LightBurn work with every laser engraver?
No. While LightBurn supports many CO₂, diode, DSP, GRBL, and Galvo laser controllers, it isn’t compatible with every machine on the market.
Before purchasing a license, always check the official compatibility list to ensure your laser controller is supported.
4. Can I use LightBurn software for business projects?
Absolutely. Many small businesses and professional engraving shops rely on LightBurn for daily production. Features such as layer management, material libraries, variable text, camera integration, and project templates make it well suited for handling custom orders and repeat jobs efficiently.
5. Is LightBurn worth buying?
For users who regularly work with compatible laser engravers, many consider LightBurn to be a worthwhile investment. Its combination of design tools, machine control, and workflow features can save time and reduce production errors.
Whether it’s the right choice depends on your machine, project requirements, and budget, so it’s worth evaluating the available features before purchasing.
Conclusion
LightBurn software has become one of the most respected applications in the laser engraving community, and it’s easy to understand why. Instead of forcing users to juggle multiple programs, it brings design, editing, laser control, and project management together in one streamlined workspace.
Whether you’re engraving personalized gifts in a home workshop or producing custom products for customers every day, the software offers tools that can simplify your workflow and improve consistency. Features like layer management, material libraries, live previews, and support for a wide range of laser controllers help users complete projects with greater confidence.
That said, software alone doesn’t guarantee great results. Taking the time to learn your machine, test different materials, maintain your equipment, and follow safe operating practices will have just as much impact on the quality of your work.
If you’re looking for software that balances powerful features with ease of use, LightBurn software is well worth considering. As your skills grow, you’ll likely discover new tools and techniques that make your engraving projects even more efficient and professional.